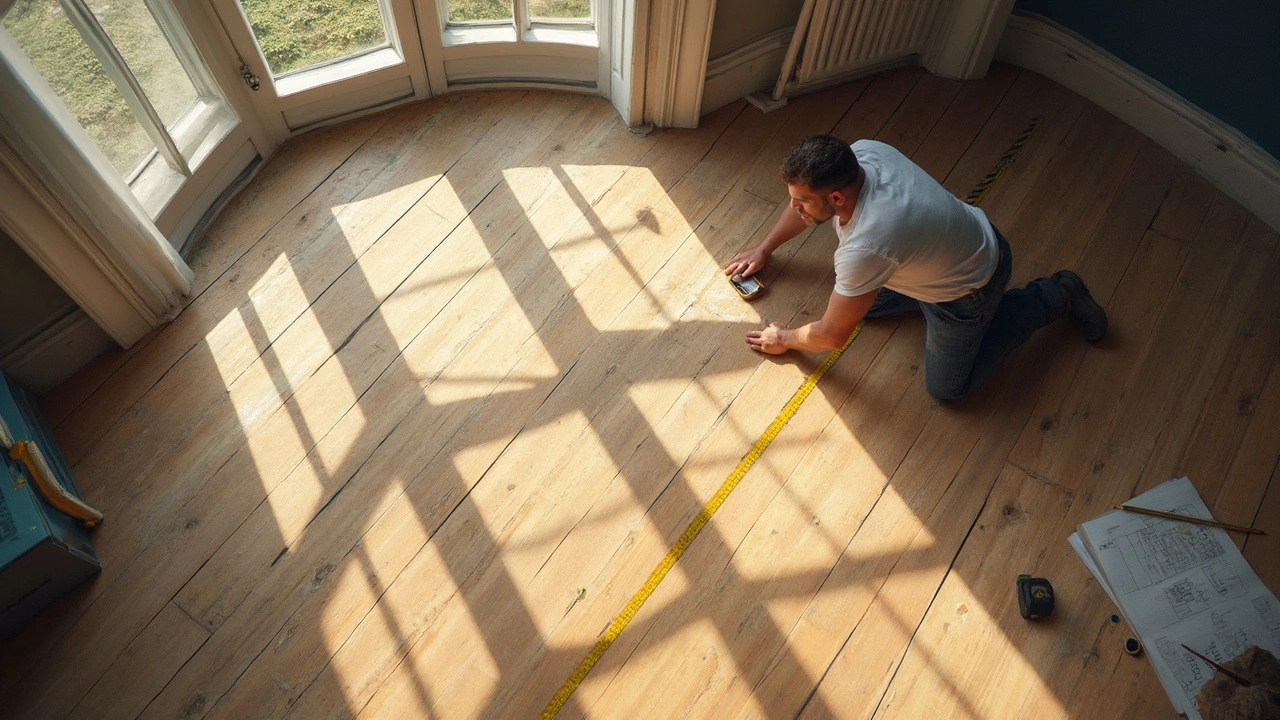
If you hate crooked floorboards or tiles that don’t line up right, you need to know the 3 4 5 rule. This simple trick helps you check if your room is square before you start laying down any type of flooring. Trust me—crooked floors stand out like a sore thumb, and fixing them later costs time and money you’d rather not burn.
The idea is simple. The 3 4 5 rule is based on the basic math behind right triangles, thanks to the Pythagorean theorem. Grab a tape measure. Measure three feet along one wall, then mark it. From that mark, go four feet out at a 90-degree angle and mark again. If the straight line between your starting point and this last mark is exactly five feet, your layout is square. If it’s off, your room isn’t square or your marks need adjusting.
- Understanding the 3 4 5 Rule
- Why Room Squareness Matters
- How to Use the 3 4 5 Rule for Flooring
- Pro Tips for Flawless Results
Understanding the 3 4 5 Rule
Before you start throwing down planks or tiles, you’ll want to know if your floor space is square. That’s where the 3 4 5 rule shines. Everyone from old-school carpenters to DIYers uses it, and it’s all about using just a tape measure—no fancy gadgets required. The whole thing is based on a right triangle: makeup one side to be 3 units, the other 4 units, and the third should measure 5 units if the angle between the first two sides is exactly 90 degrees. Units can be feet, inches, or even meters, as long as you keep the scale the same.
Here’s why it matters: floors that don’t start out square end up with gaps, weird angles, and cuts that waste material. If you set that first row wrong, everything after it just falls apart. It’s not just a neat carpenter trick—if you look at U.S. building manuals, the 3 4 5 rule is listed as the go-to way to check squareness because it’s quick and reliable.
The math backs it up. It’s just the Pythagorean theorem (A²+B²=C²), but you don’t need to remember formulas. The numbers 3, 4, and 5 work perfectly because 3 squared plus 4 squared equals 9 + 16, which is 25, and the square root of 25 is 5.
| Side 1 | Side 2 | Diagonal | Result |
|---|---|---|---|
| 3 | 4 | 5 | Square Corner |
| 6 | 8 | 10 | Square Corner (scaled up) |
That means you’re not locked in to 3, 4, and 5. You can double or triple those numbers for a bigger space. Some pros go 6, 8, 10 if they’re dealing with a large room; it just makes little mistakes easier to spot. Just a tip: always use a sharp pencil or chalk for your marks—the more precise you are, the better your flooring layout will look.
Why Room Squareness Matters
Getting the room square before you even open a box of flooring is a game-changer. If your floor is out of square, you’re asking for headaches down the road. Boards or tiles that start off straight in one corner can end up looking slanted across the room. This isn’t just annoying—it’s super noticeable, especially with patterns like herringbone or big, long planks. And yep, you’ll probably end up wasting materials trying to hide odd gaps by the wall.
Flooring installers always check squareness because even new homes are rarely perfect. Builders can be off by a half-inch or more, and that adds up. Imagine starting a flooring layout on a wall that’s out of square—by the time you reach the opposite side, you might find yourself grabbing a saw to slice slivers off every piece just to keep things lining up. That means a lot of time, frustration, and mistakes you could have totally avoided.
Here’s a quick look at how tiny errors in squareness stack up, especially with popular plank sizes:
| Room Width | Off by 1/4 inch | Off by 1/2 inch |
|---|---|---|
| 10 ft | Noticeable gapping | Pieces visibly skewed |
| 15 ft | More than one tile width off at far end | Crooked lines very obvious |
If you want to avoid the dreaded crooked-floor look, using the 3 4 5 rule before starting any flooring installation just makes sense. It gives you a rock-solid starting line, so your pattern looks sharp and professional. Nobody wants to spend a weekend on their hands and knees just to end up with results that scream 'rookie.' Double-checking your layout with a quick 3 4 5 squareness test saves time, money, and sanity.

How to Use the 3 4 5 Rule for Flooring
Getting started with the 3 4 5 rule is pretty straightforward, and you don’t need any fancy gadgets—just a tape measure, a chalk line or string, and a pencil. Here’s the no-nonsense way pros use this to lay out a floor, whether it’s hardwood, tile, vinyl, or laminate.
- Pick Your Starting Wall. Most folks start with the longest or most visible wall. This helps the pattern stay straight in the spots where people will notice most.
- Measure 3 Feet. From one end of that wall, measure out exactly 3 feet and make a clear mark.
- Measure 4 Feet Out at a 90-Degree Angle. Using a carpenter’s square or just ‘eyeballing’ a right angle with a second tape measure, run a line 4 feet out from your 3-foot mark. Make a mark there, too. Make sure you keep the angle sharp—if it’s off, the measurement won’t work.
- Connect and Check the Distant Mark. Now, measure the straight line from the starting point to your 4-foot mark. It should be exactly 5 feet. If it’s not—say it’s longer or shorter—then your angle isn’t square. Adjust until you nail it, because this line shows the direction your flooring layout should follow.
- Snap Chalk Lines. After checking, use a chalk line to snap a perfectly straight guide across the floor. That’s your roadmap for laying out tile, planks, or whatever you’re putting down.
This method isn’t just for big open rooms. Do this in long hallways, narrow bathrooms, or anywhere you want those lines to be dead-on. It’s the quickest way to avoid that awkward moment when you realize you’ve got to trim an odd wedge off your last floorboard.
Flooring installers often say using the 3 4 5 rule saves them at least 15–20 minutes per room compared to "eyeballing" a layout—which adds up fast on big jobs.
| Measurement | Result for Square Angle |
|---|---|
| 3 feet | From wall |
| 4 feet | Out at 90-degree angle |
| 5 feet | Between starting and 4-ft mark |
Once those lines are snapped, you can lay your flooring installation with confidence, knowing everything’s starting square. That makes it way easier to get clean edges and a pro finish—even if it’s your first time tackling a floor.
Pro Tips for Flawless Results
Want your flooring installation to look pro-level? Use these tried-and-true tips to dodge common mistakes and keep your lines straight and square. Even seasoned installers double-check their measurements—tiny slips make a big difference once you hit the last row.
- Double-check measurements. After marking your 3, 4, and 5-foot points, measure them again. Tape measures do stretch with use, and a half-inch off can mess up the whole flooring layout.
- Mark with a chalk line. Once the 3-4-5 triangle checks out, strike a chalk line across your starting wall. This gives you a dead-straight reference for lining up your first row of planks or tiles. If you start wrong, every line after it will be off, too.
- Use spacers by the wall. Give yourself a little wiggle room. Walls are rarely perfectly straight, even in new builds. Leave a tiny gap (about a quarter inch) for the material to expand. You’ll cover it with molding or baseboard later.
- Check squareness along the way. Don’t wait until the last row to notice a drift. Every few rows, lay a framing square or even a builder’s square to your lines. Early fixes are easy—late ones, not so much.
- Lay out a dry run. Test-fit a few rows without permanently setting them. This quick check can catch mistakes before the glue or nails go in.
Here’s a quick look at how the 3-4-5 rule can save time and materials in real-world jobs:
| Step | Without 3-4-5 Rule | With 3-4-5 Rule |
|---|---|---|
| Initial setup time | 10-15 minutes | 15-20 minutes |
| Materials wasted/cut wrong | Up to 15% | Less than 3% |
| Time spent fixing mistakes | 1-2 hours (avg per room) | 5-10 minutes (minor) |
Taking the few extra minutes to use the 3 4 5 rule for measuring floor squareness saves way more hassle down the line. Pros say a chalk line and a trustworthy tape measure are worth their weight in gold. A little patience now saves you from crooked boards, weird cuts, and hours of frustration later.